Last summer, during a trip to the Orkneys, my beloved Sony Handycam had a bad encounter with a 5000-year-old Neolithic settlement (Translation: I dropped it on the floor at Scara Brae.. oops!), and has steadfastly refused to play back material ever since. To be honest, I was due a camera upgrade anyway — the HC27 is standard definition, and doesn’t have all the fancy-pants image stabilisation tricks that modern cameras have — so I used its unfortunate demise as an excuse to buy a shiny new camera (a Sony CX130 – which I *love*).
However, I’ve still got all these old mini-DV tapes sitting around the house, many of which I never got around to transferring to computer files… and some of which I’d really like to get access to. There’s clips of Mick and Tony noodling around in the studio… a couple of full-length Carbon/Silicon gigs… some British customs events that never made it onto Averil’s website (Cotswold Shin-kicking!), etc etc…
I’ve been watching eBay to see if I could pick up an old Mini-DV camera for next to nothing — purely as a way to get my tapes downloaded — but, alas, to no avail. I would’ve thought that as HD/AVCHD cameras picked up in popularity, people would be dumping standard def Mini-DV in droves, but that doesn’t seem to be the case yet. (Plus, there’s always a risk that since I recorded my material in extended play mode, a different camera wouldn’t play it back in quite the right way).
So, yesterday I bit the bullet and decided to see if I could pull the camera to bits and adjust the tape heads and get it working again… I mean, the camera was pretty useless anyway; it’s not like I had anything to lose. Things actually worked out pretty well, and was a simpler job that I was expecting. I thought I’d post an account of my tinkerings here, just in case any future googlenaughts are looking for hints on DIY Sony DCR-HC27 repair 🙂 (…anybody else can probably stop reading now – dull tech stuff follows!)
This process assumes you have some kind of video head alignment issue… i.e. if you play back the video, it looks scrambled/blocky on screen, and if you try to download stuff over firewire the resulting stream is corrupted. If you have some other kind of problem… sorry, this isn’t going to help.
Also, please be aware that I’m not in the slightest bit qualified to pull apart video cameras, and I only have an enthusiastic geek-amateur’s knowledge on how these things work. Somebody who actually knows what they’re doing might read this, suck the air through their teeth, and say “This guy did WHAT???!” … hey ho. Whatever. It worked for me 🙂
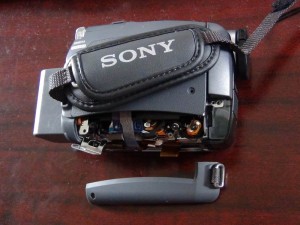
This is the panel that you need to get off. I’d love to be able to give you a step-by-step guide to getting into the thing, but I wasn’t intending to write a blog entry on the subject, and wasn’t documenting what I was doing as I went along… (plus, I ended up cheating on one of the screws. Hmmm. More about that in a moment). As a minimum, you need to get off the panel on the base of the camera (and the EMI shield behind it), and the black plate at the front of the camera before you have access to all the screws you need to undo to get at this one. I actually ended up stripping off pretty much all of the camera casing – it looks tidy in this shot because I put most of it back together before making any internal adjustments (since the bare chassis doesn’t leave you much to hold on to!)
Oh, I haven’t put in a disclaimer yet, have I? OK: YOU PULL APART YOUR VIDEO CAMERA AT YOUR OWN RISK. THERE’S A PRETTY GOOD CHANCE IT’LL NEVER WORK AGAIN, AND IT’S YOUR OWN SILLY FAULT FOR DOING WHAT SOME RANDOM GUY ON THE INTERNET TOLD YOU TO DO. MAYBE YOU’LL EVEN INJURE YOURSELF TOO (well, that’s certainly unlikely, but…) – I HEREBY ACCEPT NO RESPONSIBILITY FOR THE CONSEQUENCES OF FOLLOWING THESE INSTRUCTIONS. PROCEED AT YOUR OWN RISK.
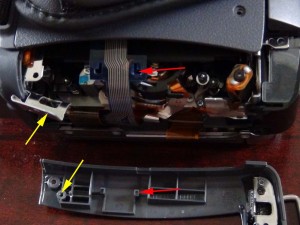
OK, back to business. Here’s the gotchas that you need to be aware of when taking this panel off. Firstly – there’s a ribbon cable clipped to the back of it – the cable, and clip, is shown with the red arrows above. If you unhook it by poking a small screwdriver (or similar) through the tape loading door prior to taking the camera to pieces, you will have an easier time of things.
Gotcha #2 is a bit trickier. There’s a concealed screw coming from the camera chassis into the BACK of this panel. The screw-hole, and chunk of chassis involved are highlighted with the yellow arrows above. I’ll be honest: This one beat me. I stripped a bunch of components off the camera, and STILL didn’t find a way to access that screw – I think you might need to do some *really* hardcore disassembly/stripping down to get access… and since this was really a data recovery exercise, rather than a repair job (I’m not really bothered if the thing never works as a camera again – I just want to access the tapes!)… I opted to just bend the tab out until I could get a screwdriver in. The metal is very thin, and it wasn’t hard to do – I think It’ll bend back fairly easily, if I want to reassemble the camera again later. There’s probably a Sony service manual hidden somewhere on the internet that tells you how to get this screw out the right way… but, if you can find it, your powers of web-fu are stronger than mine!
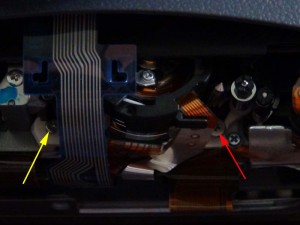
OK, the panel is off… reconnect the battery and power up the camera (you DID disconnect the battery before pulling this thing to bits, didn’t you?), load a tape, and set it playing. You’re going to want to tweak the two screws shown in the picture above… and you need the screen in a position where you can watch the video while you’re tweaking (or, I guess hooking up an external display would make the job even easier… but I didn’t do that). Start with the big screw on the right (RED arrow). Unless the video camera has had a pretty severe bouncing and your video heads have moved *way* off, it’s only going to take a small adjustment… we’re talking a quarter turn, or something like that. Tweak until you can (a) hear the video soundtrack playing properly, and (b) only see one or two corrupted macroblocks on the video stream. The soundtrack is probably the best clue; there are all kinds of settings where you’ll see (corrupted) stuff on the screen, but if the soundtrack is decoding correctly, you’re getting close to where you need to be.
Once your video is close-to-correct, use the screw on the left (YELLOW arrow) to make fine adjustments… here’s a trick I found for getting it right: look at the timecode on your video (top right corner) – it reads something like HH:MM:SS:ff … where “ff” is the frame number, looping up from 1 to 25 really fast (at least, it goes to 25 on my PAL camera… I guess if you’ve got an NTSC camera, it goes up to 30 or something like that). My frame count looked a bit jittery… which I assume meant the camera was still dropping frames. I found that a tiny adjustment of this left hand screw eliminated those jitters (and, at the same time, removed the few remaining rogue macroblocks from the display). Result!
My camera now plays back tapes *perfectly*. I can’t guarantee that this same procedure will work for you… but, I’m a happy bunny, and you never know… somebody might find this info useful, so I thought I’d share 🙂


 Follow